To overcome the problem of not being able to find your customer data as your customer base grows, ChatMamba CRM provides a powerful search engine out of the box that can quickly filter, sort, and search your data according to your preference. You can also manage the columns’ visibility to show only the relevant columns to make your table less cluttered.
Managing Columns
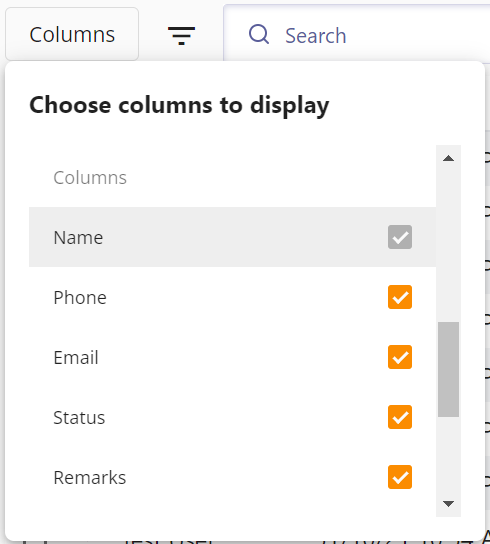
To manage column visibility:
- Click on Columns on the top left corner
- You will see a list, each representing a column in your table. The column with a tick(✅) is visible in the table.
- Show/hide columns as you need and close the settings.
To reorder columns:
- Hover to the column you wish to reorder.
- Click on the drag icon and reorder to your desired position.
- Release the handle to reorder the columns.
To resize columns:
- Hover to the edge of the column.
- Drag on the orange resize-handler to start resizing.
- Release the handler to finish resizing.
Filtering, Sorting and Searching your Data
The power of the search engine shines when you are managing an increasingly large customer base.
Let’s say you want to find all customers you previously called, but they didn’t answer (i.e. customers with status of Called, No Answer. All you have to do is:
- Open the filter sidebar by clicking on the Filter icon.
- Find the Status column.
- Tick the Called, No Answer option.
After filtering the data, you may want to sort them according to when they were last updated. To sort your data:
- Scroll to the top of the filter sidebar.
- Click Sort By
- Select the sorting option you want (in this case, Last Update (desc) ).
- You can show the Last Update column to verify that the data are sorted correctly.
Saving Refinement Settings
Say you want to keep the filter and column settings you have set earlier for quicker access in the future, you can save them as a new view.
- Open the filter sidebar
- Click on the “Save as new view” button at the bottom of the sidebar.
- Give the view a descriptive name.
- You can view the data with the settings in the future by navigating to the view on the top.